
MathWorks is a software developer and provider of mathematical calculations and model-based design for engineers and scientists. From a product perspective, the relationship between MathWorks and Kvaser is quite simple.MathWorks has developed some very powerful and excellent analysis and simulation software.such as MATLAB and Simulink.And Kvaser produces high-quality hardware to capture data and access the CAN bus (and also develops some free software).
Kvaser and MathWorks co-organized a webinar entitled “Using J1939 Field Recorded Data for Data Analysis and Modeling Fundamentals”.The course is highly practical, not only explaining the basics of J1939, but also introducing the use of Kvaser Memorator for data logging.The presenter leads the audience through the whole practical process, including exporting the data as MDF files, then importing them into MATLAB, and decoding them in MATLAB for further analysis.The course concludes with a demonstration of how to play back recorded data in a Simulink model.
Kvaser and MathWorks
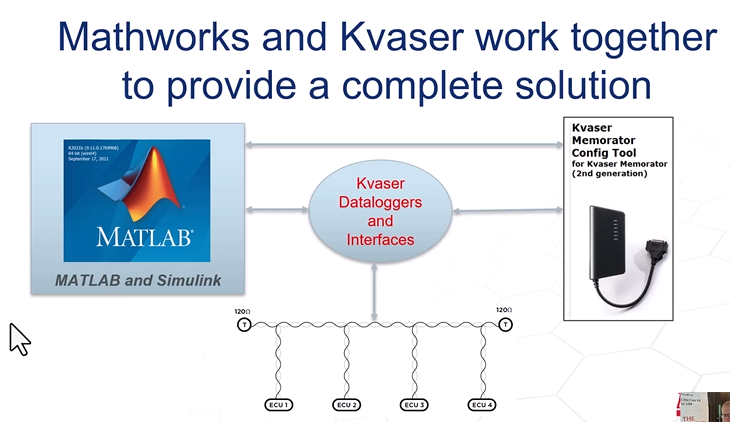
The Kvaser recorder interfaces with the CAN bus and provides data directly to Matlab and Simulink.It also provides the data to the Kvaser Memorator configuration tool, where we will store and configure the log data in the appropriate format for subsequent analysis by MathWorks products.
CAN Protocol Stack

The underlying physical layer and data links are Kvaser's specialty and are covered by Kvaser hardware products and some J1939 specification examples.These specifications actually cover those parts of the stack.
The role of the physical layer is to obtain 1s and 0s between devices and across the network. the data link layer defines these 1s and 0s, defines the raw data, and puts it into a CAN frame for the transmission layer to follow.The transport layer intercepts the data and retrieves it from its original frame over the network. Larger packets are broken down into usable and transmittable sizes at the transport layer. There are some J1939 specifications that deal with this problem, -21 for classic CAN and -22 for CAN FD.
This seminar focuses on classical CAN, but a lot of it applies to CAN FD as well. as the picture above shows, there are applications up there: -71, -73, different application specifications under J1939 that define the signals, define the parameter groups of the PGNs, the parameter group numbers, the signal offsets, the actual physical or actual application level stuff, and other things that you need to know, and the reason Kvaser is doing this is to get actual data. The reason Kvaser does all this is to get actual data. For example, the oil temperature gauge in the picture above is a signal extracted from a specific PGN and these lower level defined packages.
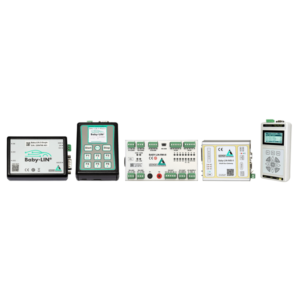
Kvaser Hardware (Memorator Light & Memorator Pro)

Kvaser's specific hardware includes, first and foremost, Memorator Light, an easy-to-use, no-configuration, 1GB logger.It can record a thousand frames before and after an error event, no need to configure the Memorator, through the adaptive serial transmission rate, it can start recording data.
Click >>Understanding Memorator Light
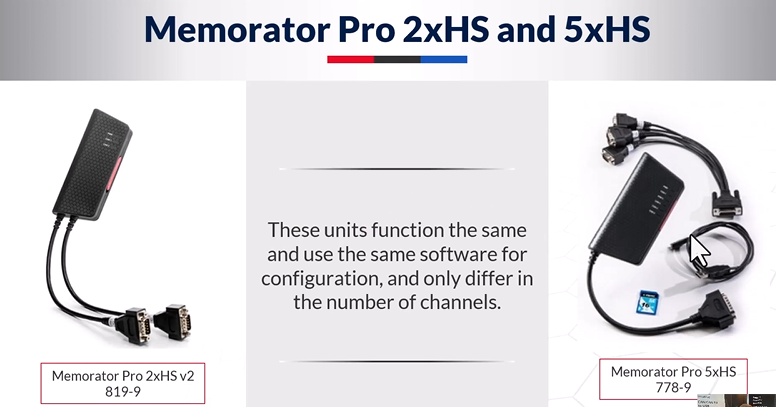
Click >>Understanding Memorator Pro 2×HS與5×HS
Beyond that.Kvaser also has two main Memorator Pro products: a 2-channel and a 5-channel device that can act as a CAN bus communicator as well as a data logger.
They all have a USB interface for PC connection, configuration and deletion of data, and an SD card for configuration and control of log data, as well as script loading and log data storage. 5-channel devices are wired with 5 channels combined, while 2-channel devices are wired with 2 channels directly and separately.
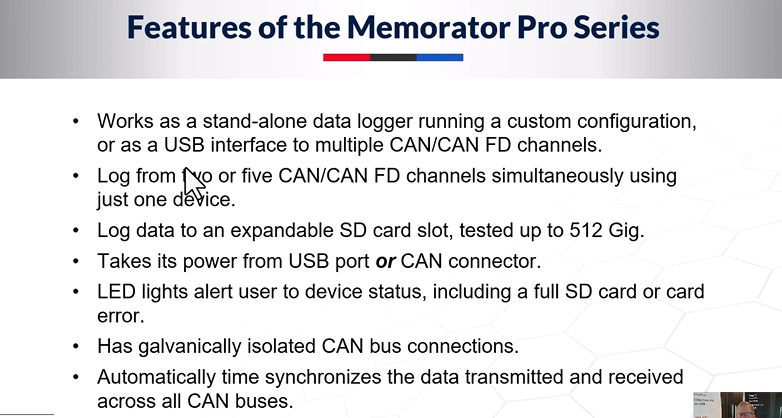
Memorator Pro features:
◉Works as a stand-alone device without the need to connect to a computer.
◉When power is supplied from the USB port, it enters the Communicator mode and can be connected to a computer.
◉When power is supplied from the CAN interface, the internally stored scripts or configurations are executed.
◉With LED, 5 display modes.
◉Features electrical isolation and automatic time stamp synchronization.
◉Available in 2-channel or 5-channel hardware.
It records data to an expandable SD card (Kvaser has tested filling a 512G SD card).When you use the timestamp synchronization feature, this will allow it to synchronize to other Kvaser devices on the same computer - the same USB or the same computer's USB port.So you can record or use 2 devices to make a 10-channel synchronized recorder.
Kvaser software (Memorator configuration tool)
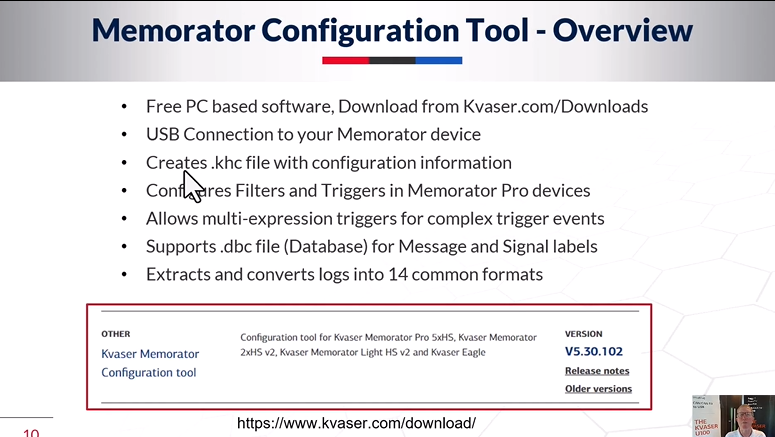
Memorator Configuration Tool is the main software to be introduced, which you can download for free from the Kvaser website download page and connect to your memory and devices via USB.This software creates .khc files with configuration information and allows you to create a configuration file for filtering programs, trigger operations on Memorator Pro devices, and supports multi-operator triggers and complex triggers.So if you want to load a database file to operate at the signal level or application level, you can do so, and it will extract the data and support conversion to 14 different common formats.
Steps to use Kvaser Data Logger (Memorator Pro 5)
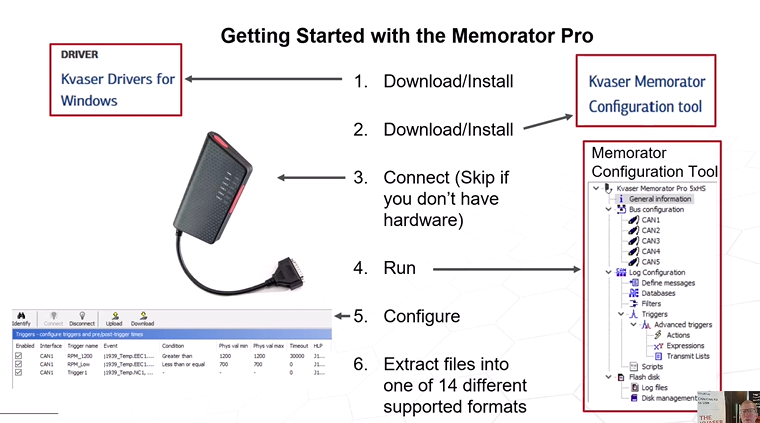
First download and install the free driver and Memorator configuration tool for Windows from the Kvaser website.After configuring the software and connecting to the hardware, start running the Memorator Configuration Tool to configure triggers, filters, and algorithms, and after capturing the data, you can extract it into one of the 14 different formats it supports.
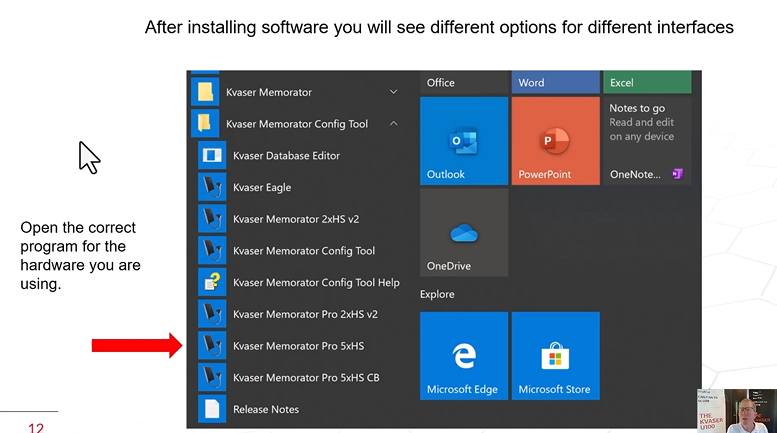
After installing the software, you will see different options for different interfaces.Includes windows startup button.After a press the Start button, you will see your Kvaser Memorator Configuration Tool.Including all devices, the arrow pointing to the Memorator Pro 5xHS is the device I'm connecting to right now, and I've taken a lot of screenshots like this one from it. Press the Connect button to connect to the Memorator Pro.After you have run the software and clicked the Connect button, you will see the serial number of Memorator Pro 5xHS listed and the USB connection is complete.All you need to do is click on it and then click Next to connect it.
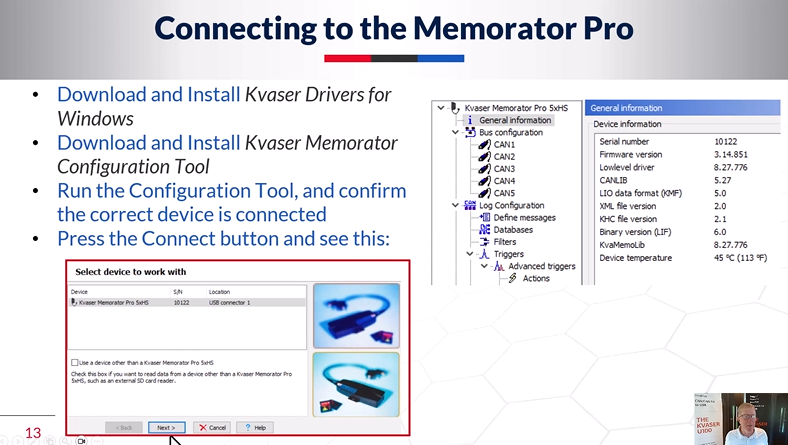
If you want to get data from a file stored on your computer, you can have it connected to a device other than Memorator Pro so that it can get data directly from the file or SD card connected to your computer.I'll show some examples here. If you click on General Information after connecting to the device, it will download all the useful information from the device.
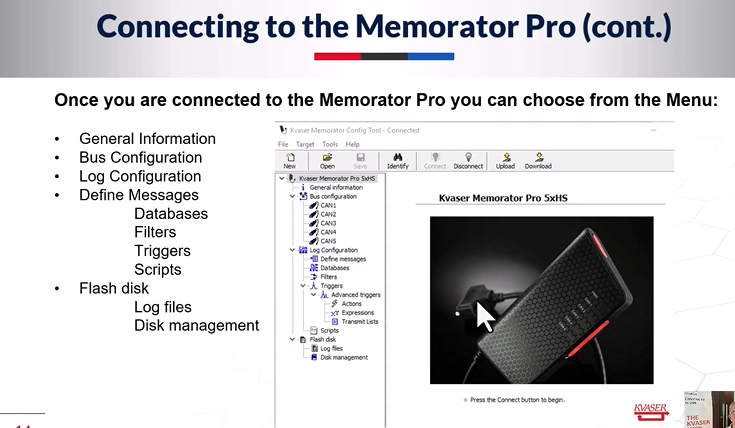
Once connected to Memorator Pro, you can select from the menu.We can see general information where you can configure your buses. In this example, there are 5 different buses, 5 channels of devices you can configure them. You can configure one or you can configure all of them, you can also set up log configurations, define reports, databases, filters, triggers, scripts, etc. If you happen to be using a t-script, you can see your tile information, the big files on the tiles, and tile management information below.
Bus Configuration
Select and configure specific CAN buses
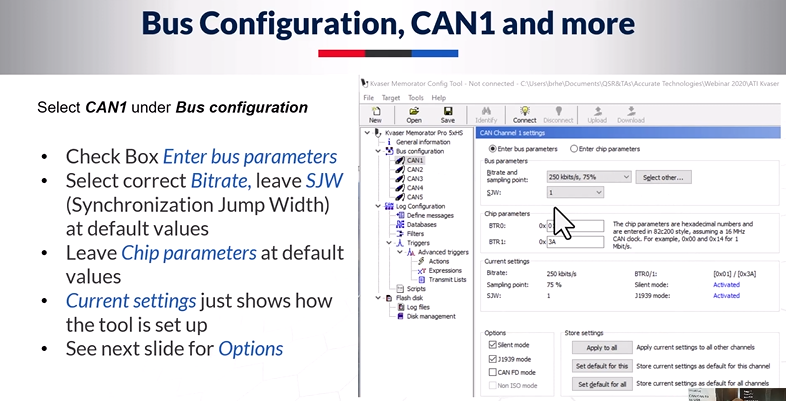
For any specific CAN bus you select, a screen appears to configure that CAN bus.When you want to set your bitrate or for more complex projects, I recommend that you leave the chip parameters as default for now.If you want to be in Silent Mode or J1939 Mode, you can check the corresponding option via the checkbox. If you are using CAN FD, you should also check the box. You can apply these settings to all different channels as well as set them as default values and use these default values on all different channels.
Options

Silent mode will disable any transmission if an error frame or response occurs or an error frame is generated, and you will disable this feature on the CAN bus if you select silent mode.The J1939 mode applies the J1939 rules to the CAN identifier, so it allows you to trigger the CAN identifier on the PGN...extended to 29 bits of the CAN, which J1939 defines as Priority, PGN, and Source Address. Thus, the J1939 mode allows you to break down that identifier into finer definitions of J1939 and perform specific operations based on the definitions.
Then CAN FD mode.If your bus is a CAN FD bus, select CAN FD mode and it will enable the CAN FD function.
Log configuration (Log everything)
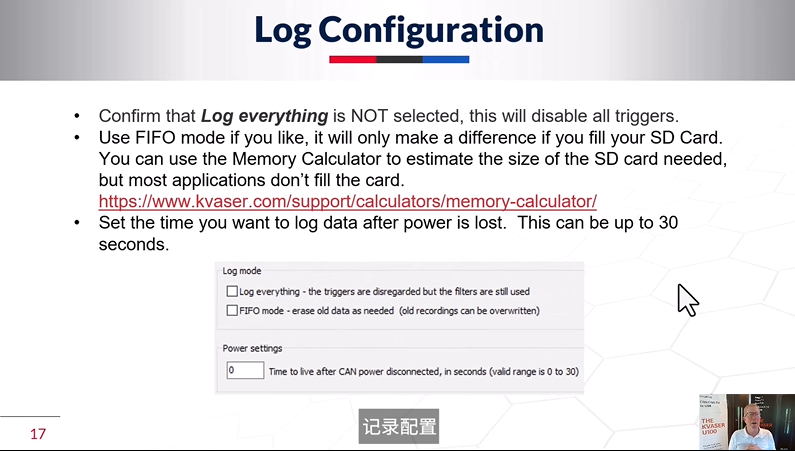
Log everything is unchecked by default in the log configuration.When checked, it records everything and your triggers are ignored, you just record everything. So if you want to use a trigger, make sure this is unchecked.You can use FIFO (First In First Out) mode to determine when your device is full.You can determine the size of your SD card over the internet by using the page on our website to view your bus bandwidth, speed, and amount of data on the bus using our memory calculator. Set the amount of time you want to record after a power failure, up to 30 seconds on this page.
Log Configuration (Define Report)
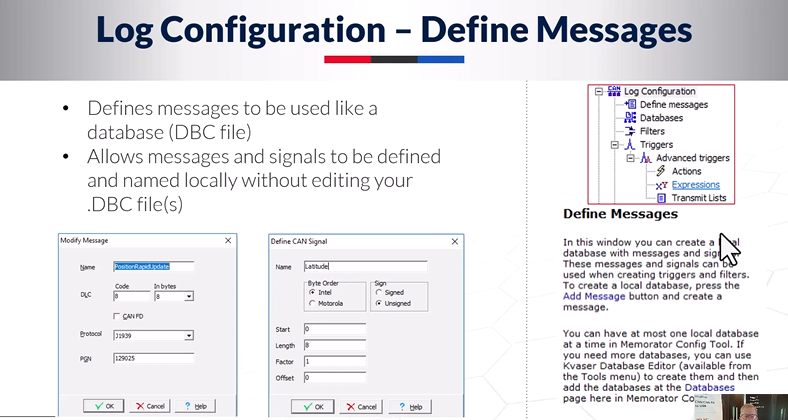
You can define the message in the Log Configuration page.This is similar to a DBC file, but it is more independent of the program. You name a specific message and then name a specific signal. You can set up a message here.A quick update is an example of a message. This is actually an EMEA 2000 message, very similar to J1939. It uses this structure. It will be a signal in the message: latitude. So this is a message from GPS, and your latitude will be the first 8 digits from 0, with a factor of 1.
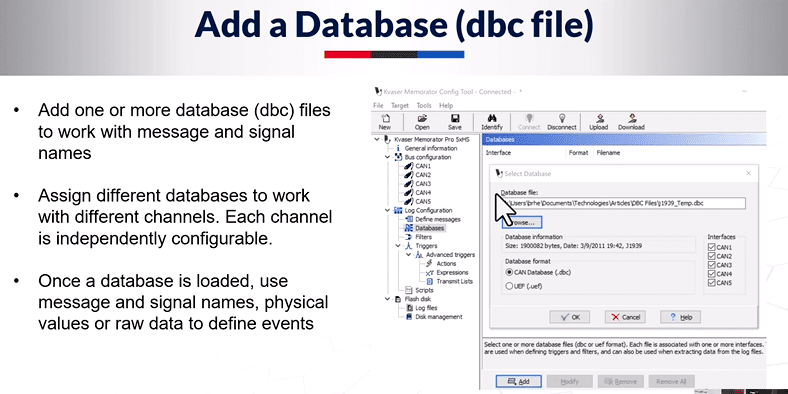
You can add a database for more message definitions through a DBC file.You can add one or more databases, assign different databases to different channels, or assign the same database to all channels. After loading a database, you can use the message and signal names defined in that database, and you can trigger original or defined events based on the scaling and offset of the data applied to the database.
Log configuration (filter program)
.png)
Up to 64 filters per channel are defined to be applied to the log data before triggering.So the key here is not to filter out your triggering events, be careful with that.The filter program includes options in J1939 format, as I described earlier.Report, Signal, Error Frame, External Event, PGN, Source and Destination, depending on what you select here, you will get different pages with different combinations of filters to choose from.Your filters can be pass filters, so you only pass certain data that meet the filter criteria. Count through the filter, which means you are only passing one-tenth, one-fifth if you want to; or stop the filter, where you can stop a specific signal that meets the criteria of the filter.
This is its overview. You can select each of these again and you'll get a different sub-menu for setting up these filters.
Log Configuration (Trigger)
.png)
Often, you will set a trigger for a hard-to-find event.If you don't want to record everything, but just want to capture some activity, you can set up these types of different triggers on Signal, Full CAN Info.When an externally triggered event occurs, the driver presses a button to ensure that the correct special event, timer event, is recorded, and this enables true configurability. They want to make sure that the correct special event, timer event is recorded, and that's easy to configure. You can use conditions to fine-tune the triggers and use arithmetic to set the data range. What that means is that you have a condition here where you define something like RPM 1200 or RPM Low, and then you define conditions greater than, less than, equal to it, or other different ways of defining that condition as well as some timeout data and things like that.
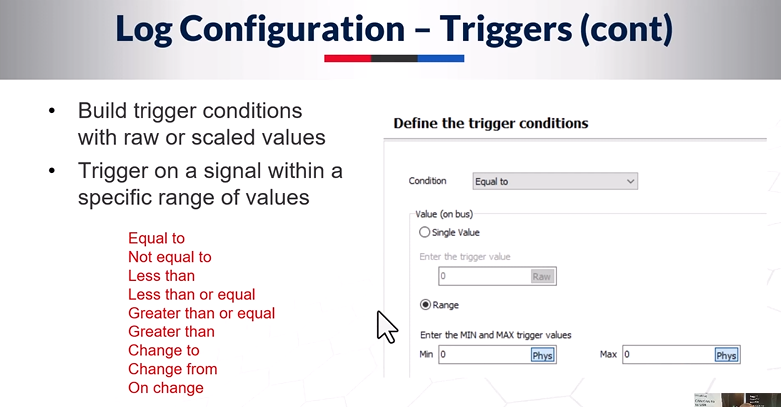
Then you can define conditions: equal to, not equal to, less than any particular condition. We use raw or scaled values to construct triggering conditions that trigger on signals within a specific range of values. All these allow you to realize triggering within these ranges or signal values. Physical or scaled values can be selected according to the DBC file or the defined signal.
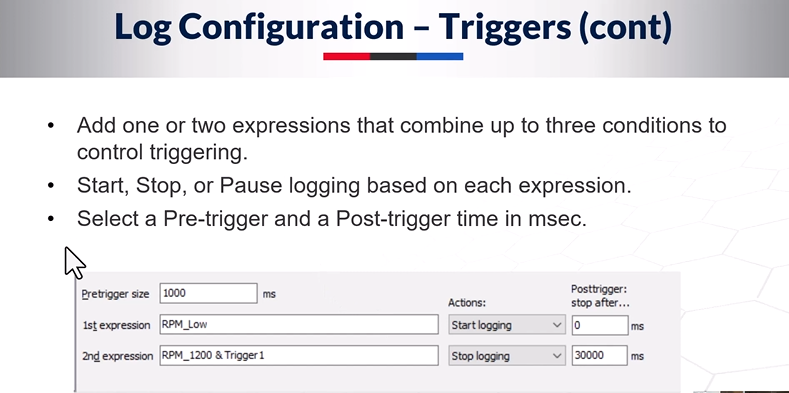
Therefore, triggers can add one or two operators that combine up to three conditions to control triggering. You can utilize the start, stop, or pause records of the operators and select pre-trigger and post-trigger times in milliseconds.We can see what this means with an example: my first operator is RPM_Low. and I'm going to start logging. That's what I'm going to do when the operator occurs. My pre-trigger size is one thousand milliseconds. So I've already got a thousand milliseconds of data before this operation. Here we will stop the logging and our post-trigger will be 30 seconds. We will use RPM 1200 to stop logging and trigger a condition that follows the one defined in the previous menu. The same goes for those operators defined in the previous menu. Choosing a combination of operators and how those operators control the actions of the recorder, e.g. start software recording, marking, etc... is therefore very, very flexible.
Log Configurator (Advanced Trigger)
.png)
If you are using the Advanced Trigger, here we show the loaded DBC file - the J1939 temporary DBC file.There are a lot of different DBC file definitions for the algorithms, these are advanced triggers, you can create transfer lists and set transfer schedules.You can use a transmission list to induce an event that will induce your engine to a specific state that you might want, such as diesel regeneration, etc. You can also use a transmission list to induce an event that will induce your engine to a specific state that you might want, such as diesel regeneration. You want to start your engine manually to troubleshoot it, you want to induce it or send some relevant information to trigger an engine fault and see how it behaves in these situations.
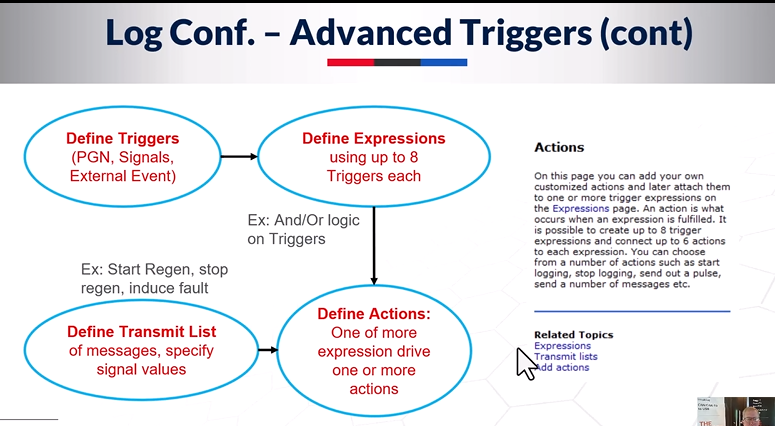
You define triggers and expressions, up to 8 triggers per expression, and then you define the list of actions and messages to be taken against those expressions, and you specify the signal values in that list of transmissions to be fed into the actions you define. It's very flexible, and if you're working on a truck, you might want to have this tool on hand because it would make things a lot easier.
Write/t Script
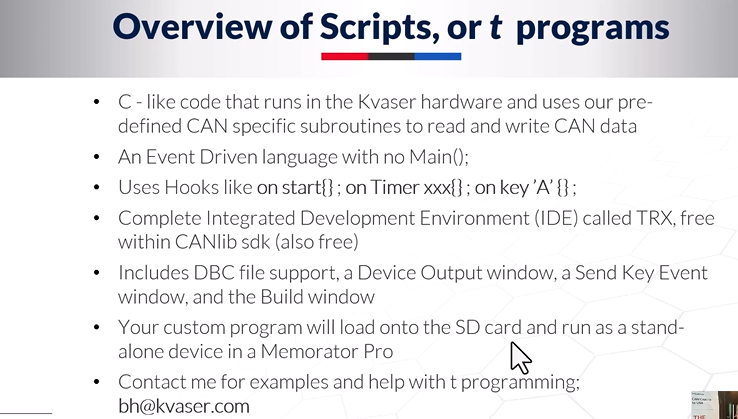
Any introduction to the Kvaser Pro device should mention scripting. t-scripting is our scripting language, similar to C. It is an event-driven language with no real main program. It is an event-driven language with no real main program. It has what we call a startup hook, a timer hook, a pushbutton hook, and a CAN message hook - the really common hooks of the day, and it executes code on those specific events or hooks.We have a complete free IDE called TRX in the CANlib SDK, which is also free.
The Device Output window can send key events. This is a window where you can interact and control your program with different key events, and I find it very, very useful.There is also a Build window, which will show you if your program is compiled there, if there are any errors, and so on.Your custom program will be loaded onto the SD card and run as a standalone device. There's also Memorator Pro, which allows you to swipe the program into memory so that when the device is used as a standalone device in a vehicle, it will run and capture rare, hard-to-find events.
About Kvaser freeware, you can ?Click hereFind and download the required software.
SD Card (saves configuration and log data)

The SD card is installed inside the device and everything is stored on the SD card. When you click on the small flash disk area below, you will see the free space and used space on the SD card. You can view the log files. For example, it will hold your configuration and log data, your t-scripts will be here, and there are disk management options for reformatting disks, clearing options, and similar operations.
Disk management (managing SD cards)
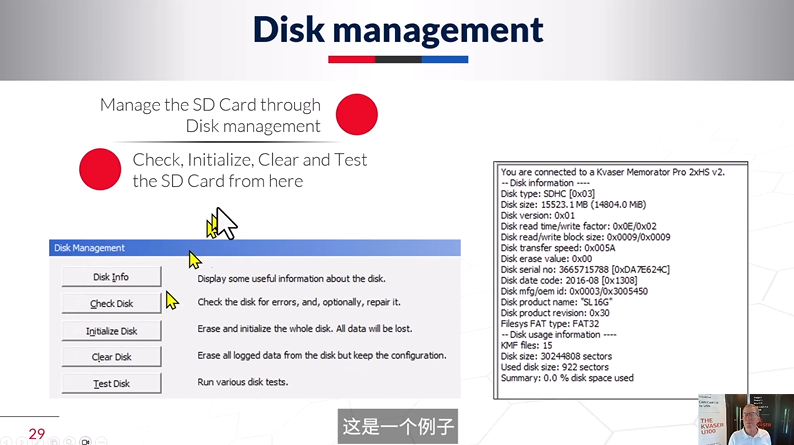
In Disk Management, you can manage the SD card through Disk Management.You can check, initialize, empty and test the SD card here.Above you have the options. These are some of the information about the SD card that has been loaded into the machine. Tile Information, Tile Check, Initialize, Empty and Test Tiles: all available under Tile Management.
Flash Disk (Extract and Convert Files)
.png)
Flash disks can extract and convert files, so when you go to extract a file, you will see this menu here.You can choose the format of the extracted file according to where and how the file is used.When you list the files - here are some sample files that I have acquired over the years. I've got log files here and I've clicked on the list and I can select any of them and extract them into one of these formats on my computer. It's a great, powerful tool after you've logged your files.
Conclusion
Memorator Config Tools performs filtering and logging.Data from one or up to five CAN buses can be recorded with just one device. All Kvaser software is free of charge and can be downloaded from the Kvaser website.
You need it to configure Memorator Pro to extract log files, download and run t-scripts from the SD card while in standalone mode.Memorator Pro can be configured as a custom stand-alone diagnostic tool with filters, triggers and log data extraction options.It gives you a wide range of applications and many different high-level protocols - the J1939 opens and does most of the work associated with the J1939 and NMEA2000, and it's also powerful for any protocols we don't even know about or any objects defined by the customers running the Kvaser hardware. We usually transfer all CAN data via the USB port by other means.
If you have any questions, please feel free toContact Us!